The Python programming language has many different versions. Similarly, all Python libraries also have multiple versions, work with specific versions of Python and most of them depend on other packages to run, this is known as a set of dependencies.
Every data science project that you undertake is likely to require its own unique set of third-party Python packages. Virtual environments act as self-contained environments encapsulating the Python version and all dependencies for a project. Creating a new virtual environment is one of the first steps that is usually taken when starting any new data science project.
Creating a new virtual environment is one of the first steps that is usually taken when starting any new data science project.
These environments not only help to keep dependencies for a project organised and self-contained on your own machine. They also make it easy for projects to be shared between people. The virtual environment retains information about all these project dependencies. When another person downloads your project to their local machine they can use this information to recreate the exact environment that your project relies on to work.
Getting started
When it comes to virtual environments for Python there are several options. Each tool comes with its own plus points and drawbacks. As a data scientist, it is likely that you will eventually find your own personal preferred option (mine is pipenv). However, it is likely that in your professional life you will at times use several, depending on the company or team you are working with. It is therefore useful to have an understanding of the core tools available.
In this article, I am going to introduce the three main tools for creating Python virtual environments and give a brief introduction to how to use them.
To follow this tutorial you will need to make sure that you already have Python and pip installed. To do this run the following from the command line.
python --version
pip --version
If you don’t already have Python installed this guide gives the best set of instructions that I have found.
All code examples given in this article are intended to be run from the command line.
Venv
Venv is a module for creating lightweight virtual environments that comes as standard with the Python programming language. If you have Python 3 installed then you do not need to install anything extra to use this tool.
To create a new environment we first need to create a directory where you would like to store your project. Run the following command in your terminal.
mkdir myproject && cd myproject
Next, we create the virtual environment within this directory. You can replace the word venv with another name for your virtual environment.
python3 -m venv env
By default, this will create a virtual environment with the latest version of Python. At the time of writing this was 3.7. However, if you need a specific Python version you can specify it as shown below.
python3.5 -m venv env
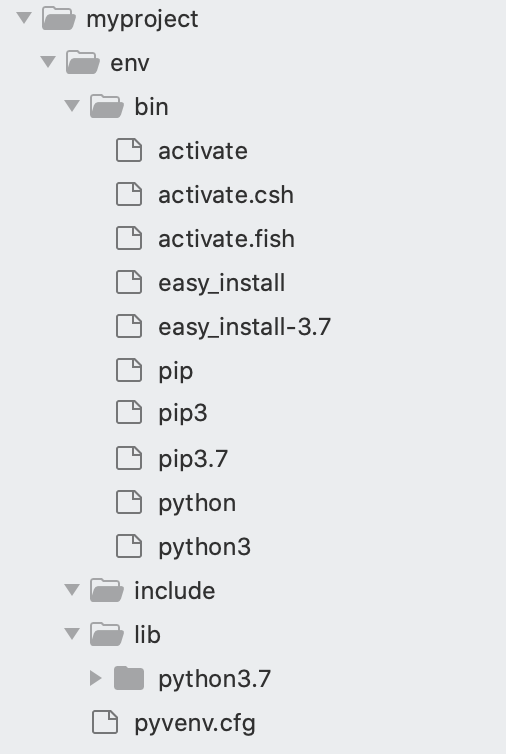
The tool will create a new directory called env which will have a structure similar to the one shown below.
The next step is to activate the environment.
source env/bin/activate
You will now see the following in your terminal.

To deactivate the environment once you have finished working on your project simply run.
deactivate
New packages can be installed into the activated virtual environment using pip. The code below installs pandas into the environment.
pip install pandas
We can see that the pandas package and its dependencies have been installed into the site-packages folder of the virtual environment.

To make the virtual environment reproducible by others we need a way to record all of the third party packages and their versions used. The simplest way to do this with venv is to create a new requirements file in the projects root directory.
To do this we run the following.
pip freeze > requirements.txt
The pip freeze command lists all the third-party packages and versions installed in the environment. The output of this is then written to a new file called requirements.txt.
This requirements file can now be used by other people to recreate the exact environment the project needs to run. Another user can download the project, create their own environment using venv and use the requirements file to install all the required packages.
Pipenv
Pipenv is another tool for creating Python virtual environments that offer a slicker, richer and more secure method. Pipenv automatically manages project dependencies via something called a pipfile. Rather than having to manually create and maintain a requirements.txt file, pipenv creates a pipfile when the virtual environment is created and updates it when a third party library is installed or upgraded.
Additionally, when a new pipenv virtual environment is created it also generates a file called pipfile.lock. As discussed earlier many third party libraries depend on specific versions of other libraries to run. These are known as interdependencies. The pipfile.lock file keeps a record of these interdependencies and ensures that certain packages are not automatically upgraded which could break the project.
The best way to install pipenv if you are using a macOS is to use Homebrew, as this will install pipenv and all its dependencies into an isolated virtual environment, so that it doesn’t interfere with your Python installation. Alternatively, it can be installed via pip.
brew install pipenv#orpip install pipenv
The pipenv workflow
To begin using pipenv you first create or clone a project directory.
mkdir mypipenvproject && cd mypipenvproject
Next, we run the following to install the pipenv environment. The pipenv environment will have the same name as the project directory.
pipenv install
If you want to create an environment using a specific Python version you can use this command.
pipenv install --python 3.6
This will install the environment and create a pipfile and pipfile.lock file.
To activate the environment simply type the following command.
pipenv shell
To install a new third party package we use the following.
pipenv install package-name#e.g.pipenv install pandas
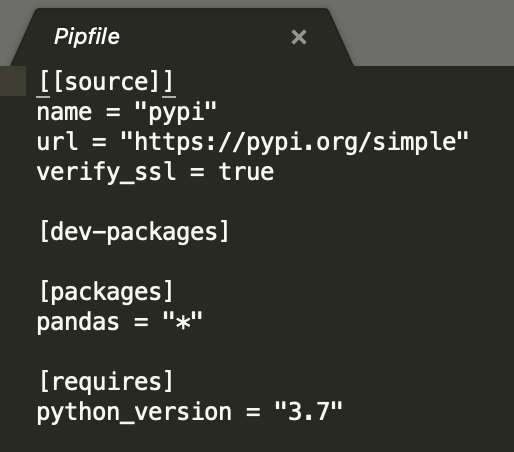
If we now open the pipfile we will see the following has been added. If we had installed a specific version of pandas the version would be included in this file.
To exit the pipenv virtual environment simply type exit .
Sharing your project
With pipenv when another user wants to recreate your project on their local machine, they can simply clone your project, and run the following commands from the project home directory.
pipenv install
pipenv shell
This will install all dependencies in the pipfile and activate the virtual environment.
Conda
Conda is an open source package and environment manager for Python. It is a popular choice in the scientific community for installing packages and managing environments. It is therefore worth including in an article about virtual environments for data science.
If you don’t already have Conda installed, you can check this by running conda -V , you can find detailed installation instructions at this link.
To create a virtual environment using conda simply run the following from your project home directory.
conda create -n myenvname python=3.7
To activate the environment we can run the following.
conda activate myenvname
To install packages.
conda install -n myenvname package#e.g.conda install -n myenvname pandas
To deactivate the environment run.
conda deactivate
Unlike pipenv, conda does not automatically create a file to track project requirements. If you want to share your conda environment with others you will need to create one. You can do this by running the following.
conda list --explicit > spec-file.txt
This will create what conda calls a spec file which is very similar to a requirements file in venv.
This file can be used to recreate the environment by running the following.
conda create --name mynewenvname --file spec-file.txt
Virtual environments help data scientists to organise projects, keep dependencies isolated and enable collaboration with others. This article covers three of the most popular choices for Python virtual environments. It is worth trying each of them out to find which is your preferred choice.
For more information about best practices for creating reproducible data science projects see my earlier article here.
About publication
Heading: Программирование
Date of publication: 11 January 2021
Update date: 12 January 2021
Author: Rebecca Vickery
Statistics: 10457 просмотров
Materials taken from the site: medium.com
Share this:


